Sunday, September 7, 2008
Saturday, December 22, 2007
A Tedious Explanation of the f/stop
Photographers set their exposure using a combination of shutter speeds and f/stops to get the correct amount of light on the film (or sensor--this all works for digital too). The shutter speed regulates how long the film is exposed to light coming through the lens. The f/stop regulates how much light is allowed through the lens by varying the area of the hole the light comes through. For any given film speed and lighting combination there is one correct amount of light to properly expose the film. This amount of light can be achieved with many different combinations of f/stops and shutter speeds. This page goes over the f/stop and especially its initially-confusing numbering at some length.
The f/stop is a source of confusion and mystery to many photographers, even to some who use it all the time. I find it interesting that in one local local camera shop they have pictures under glass on the counter showing a scene using a range of focal lengths (for a good example of this, see my friend Dave Dahms' Lens Focal Length Chart), a bunch of photos showing the same scene printed at different sizes and a set of photos showing an action scene shot at different shutter speeds. All that is assumed to be of interest and comprehension to the customers. What they don't have is a set of photos showing depth of field, or a scene shot at a range of exposure combinations where the f/stop's effects are shown. Maybe it just takes too much explanation. Well, too much explanation is what this page is all about.
Fill That Bucket!
My favorite analogy for exposure is filling a bucket of water. A bucket is of fixed size and needs a certain amount of water to fill it, just like film, which is of a set film speed and needs a certain amount of light to capture an image. To fill your bucket, you can pour a small stream of water for a long time or a fast stream of water for a short time. Either way, you end up with the same amount of water. In photography, the size of the stream of the water is analogous to the f/stop, the length of time you pour is analogous to the shutter speed, and the size of the bucket is analogous to the film speed. Broadly speaking, from the bucket's point of view, it doesn't matter which combination of stream size and length of time you choose as long as the right amount of water ends up coming in. Film is the same; within limits, it is indifferent to the combination of time and amount of light as long as the right amount of light eventually arrives.
Shutter Speeds
Shutter speeds are a bit easier to understand, so I'll start with those. Both exposure controls run through a sequence of settings which involve doubling and halving the amount of light reaching the film. Shutter speeds are measured in seconds and fractions of a second and so the doubling and halving is self-evident. One quarter second is half as long as one-half second but is twice as long as one-eighth. One second is twice as long as half a second and half as long as 2 seconds. It's pretty easy, and this works through the whole sequence of shutter speeds. On my Nikon FE, for instance, the shutter speed sequence is:
Each of these settings is clearly half/double the length of time of its immediate neighbours (OK, I know, 1/15 isn't exactly half the time of 1/8th and 1/125th isn't half the time of 1/60th, but it's close). This doubling/halving is thus pretty simple to comprehend for this exposure setting.
F/Stops
f/stops are a bit more confusing because the numbers appear so arbitrary. This is the standard sequence of f/stops from f/1.4 to f/22. Although it doesn't seem intuitive at first, in this sequence the f/1.4 setting lets in the most light while the f/22 setting lets in the least. Also, each of these f/stops has precisely the same halving/doubling relationship as the shutter speed sequence.
1.4 2.0 2.8 4 5.6 8 11 16 22
On the face of it, going from f/4 to f/5.6 doesn't sound like halving the amount of light. What's more, 5.6 is a larger number and sounds like it ought to be more light, not less. Neither does f/4 to f/2.8 sound like doubling the amount of light. In fact, each of the numbers in this sequence is a halving/doubling of the amount of light from its immediate neighbours, just like the shutter speed settings are. Not only that, but it makes sense, as I shall show below.
The reason that both the halving and doubling and the smaller numbers mean more light things make sense is that the f/stop is a ratio. The ratio is between the diameter of the aperture in the lens and the focal length of the lens. The focal length is generally measured in millimeters, so we'll stick with those as our unit of measure. On a 50mm lens, f/2 is saying that the diameter of the aperture is 25mm. The ratio is this 50/25 = 2. A good question might be, what is the area of that aperture? Well, the aperture is usually a set of five to fifteen blades which form a roughly circular hole, so we'll use the formula for the area of a circle, which as you all remember from fifth grade math is π * radius2. For π I'll use 3.14159265. On our 50mm lens, the aperture at f/2 has a diameter of 25mm which is a radius of 12.5mm. The area of the aperture is thus π X 12.52, or 3.14159265 X 156.25, or 490.9 square millimetres.
This fact by itself isn't all that useful. It is useful in relation to the adjacent f/stops. What is the area of the aperture at f/2.8? Well, because the f/stop is a ratio of the focal length to diameter, our 50mm lens at f/2.8 would have a diameter of 50/2.8 = 17.86mm. The area of the circle thus formed would be π X (17.86/2)2, or 250.5 square mm. That's about 250 sq. mm at f/2.8 and 500 at f/2, a double/half relationship. Aha! So that's it! The area of the hole doubles and halves, it's just represented by a ratio on the lens! No wonder it's so darn confusing.
Here's a table of the aperture areas for the common f/stops for a 50mm lens:
| f/stop | Diameter of aperture (mm) | Radius of aperture (mm) | Area of Aperture (sq. mm) |
| f/1.0 | 50.0 | 25.0 | 1,963 |
| f/1.4 | 35.7 | 17.9 | 1,002 |
| f/2.0 | 25.0 | 12.5 | 491 |
| f/2.8 | 17.9 | 8.9 | 250 |
| f/4 | 12.5 | 6.3 | 123 |
| f/5.6 | 8.9 | 4.5 | 63 |
| f/8 | 6.3 | 3.1 | 31 |
| f/11 | 4.5 | 2.3 | 16 |
| f/16 | 3.1 | 1.6 | 8 |
| f/22 | 2.3 | 1.1 | 4 |
| (As shown on lens) | (50mm divided by f/stop) | (1/2 the diameter) | (pi X the radius squared) |
If you look down the column of figures on the right, you can see the (more or less) doubling/halving going on up and down the column. You can see also how the big numbers make for smaller areas since the f/stop number is being divided into the focal length, then halved, then squared, then multiplied by π. It's no wonder this seems obscure.
Why not just call for the aperture area directly? A couple of reasons. First of all, if you have a 50mm lens on and say "I shot this with my 50mm at 1/125th and an aperture area of 63 square millimeters" you will impart correct and exact information that precisely zero people will understand. It's way easier to say "I shot this at 1/125th at f/5.6". Also, 63 square millimeters is f/5.6 only with a 50mm lens. If your lens is a 35mm, or an 85, or a 300, the ratio is changed around and the exposure is different. In fact, that 63 sq. mm is about f/4 on the 35mm, f/9.5 on the 85mm and f/32 on the 300. Knowing only the area of the aperture requires also knowing the length of the lens also to be informative as to the amount of light coming through the lens. The f/stop figure incorporates both of these in one useful if initially confusing measure and the lens length is immaterial. It's shorthand, in effect. When you say f/8, you mean for this focal length (the f?), give me an aperture whose area is such that diameter of the resulting circle goes eight times into my focal length. Fortunately, the lens makers figure out all these things for us and just mark the f/stops on the lens for us. They're doing us a big favor.
Got it. What about other f/stop terms?
When people talk about an fast lens, what does that mean?
Lenses are referred to by their maximum aperture (that's the biggest hole, the smaller number). Thus, Nikon made (at least) three 28mm lenses at one point, a 28 f/2.0, a 28 f/2.8 and a 28 f/3.5. All three of these lenses had f/4, f/5.6, and so on up to f/16; they were distinguished by the maximum amount of light they could let in. The 28mm f/3.5, one of which I own, when set to its maximum aperture of f/3.5, lets in one third less light that the 28 f/2.8. The 28 f/2.8, in turn, at its maximum aperture, lets in only half the light of the 28 f/2.0 at it's maximum aperture. Lenses which have wide maximum apertures and let in lots of light are called fast lenses. Lenses which let in comparatively less light at their maximum apertures are called slow lenses. The 28 f/2.0 would be a fast lens; the 28 f/2.8 would be sort of regular, for which there isn't really a name; the 28 f/3.5 would be kind of slow.
Why wouldn't you always use a fast lens?
Weight and expense. To get those larger diameter apertures means you need larger pieces of glass mounted in correspondingly larger lens barrels. They're harder to manufacture, the lens barrel keeps getting heavier to hold all that heavy glass in alignment so it all gets weighty in a hurry, and they're more challenging optical designs. There have been very fast lenses made which have the reputation of being really nice wide open but kind of doggy performers stopped down. If you normally do not use the fast lens at its widest settings, if you are mostly at, say, f/8, then you are carrying around a heavy and expensive optic which may be underperforming its cheaper brethren stopped down.
The size penalty is really obvious in the long lenses. The weight balloons and the cost skyrockets. For instance, I used to own a Nikon 300mm f/4.5 ED-IF lens. The IF is internal focus, the ED had to do with the Extra-low Dispersion glass used. It was a sweet lens, 300mm in length, with silky smooth focusing and weighed in at 2 lbs. 2.9 oz. (989g). If I stepped up to the 300 f/2.8 lens the weight went to 5 lbs. 8 oz (2500g). Not fast enough? How about Nikon's 300 f/2? It weighed in at 15 lbs. 6.9 oz. (7000g). The 300 f/2 picks up 2 1/3 stops over the 300 f/4.5 I owned, but it takes an eminently hand-holdable telephoto that fits in the camera bag and makes it into an unwieldy unit needing a tripod, requiring its own suitcase and weighing seven times as much.
Even on shorter lenses the difference is noticeable; my brother-in-law's Nikon 55 f/1.2 is much heavier than my 50 f/1.8. His viewfinder sure is bright and that last stop can be handy sometimes, but the camera weighs a lot on the neckstrap and you start to question its value if you're shooting at f/11 anyway. If you do decide you want the fastest possible lenses, go buy yourself a Leica M6 or M7, for which you can buy a 50mm f/1.0 lens and a 75mm f/1.4. And before you think that it's modern technology that allows these wonders, recall that Canon made a 50mm f/0.95 for their rangefinder cameras back in the 1950s.
I hear stops referred to a lot. Are these always f/stops?
No. A source of confusion is that "stops", as in f/stops, has become something of a handy shorthand for other doubling/halving relationships when referring to exposure. Thus, when someone says they "stopped down", they probably did change the aperture from, say, f/8 to f/11. However, if someone says they wish they had a stop more light, they mean they wish they had twice as much. If they say they got some ASA 400 film which is two stops faster than their Sensia II, it means it is four times as sensitive and you can infer that the Sensia was ASA 100 (from 400, 200 would be one stop, one halving, and 100 would be the second stop, the second halving). Even experienced photographers get confused sometimes; I had one guy tell me he "pulled his film 6 stops, from ASA 100 to ASA 6". Well, that's not six stops, it's four. Here, count along: 100 to 50 is one, 50 to 25 is two, 25 to 12 is three, 12 to 6 is four.
Note that stops always refer to exposure things. You would not say a 100mm lens is a "stop longer" than a 50mm because it was twice as long! You would say it was twice as long, or just that it's a 100mm.
What is stopping down?
I've had a number of emails asking about this. When you stop down a lens, you are going to a larger number/smaller aperture and therefore less light. Going from f/8 to f/11 is stopping down. The opposite is opening up; going from f/11 to f/8 is moving towards the smaller number/larger aperture and therefore more light.
What About my weird f/stops?
The f/stop sequence I listed is the full stops. Most things in photography work in 1/3 and 1/2 stop increments, and you will find lenses with maximum apertures at other-than-full f/stops. In fact, among the lenses I own or have owned, there are maximum apertures are f/2, f/2.8 and f/4, all right on the full stops, and others in between at f/1.8, f/2.5, f/3.2, f/3.5, f/3.8 and f/4.5.
You Say Most things Double and Halve?
Yep. Shutter speeds do the 1/15 1/30 1/60 1/125 thing referred to earlier. The f/stops we have referred to extensively in their f/2.8 f/4 f/5.6 etc. sequence. Film speeds do the same thing. The doubling goes like this in the common range of film speeds:
25 50 100 200 400 800
Each step here is a doubling/halving of the film's sensitivity to light. Thus, an ASA 100 film requires twice as much light to be correctly exposed as an ASA 200 film but only half as much as an ASA 50 film. You would say it was a stop slower than the 200, a stop faster than the 50.
There are third-stop intervals in ASAs as well. Here are the third stop increments of ASA with the full-stops in bold.
25 32 40 50 64 80 100 125 160 200 250 320 400
There are still films made at some of the intermediate speeds, like Kodachrome 64 slide film, Plus-X Pan Professional black and white at ASA 125, and Fuji NPS and some Kodak Portra color negative film at ASA 160.
How do you refer to exposures between full f/stops?
Generally, I just say f/5.6 and a third, or halfway between f/5.6 and f/8, or something. I have a Sekonic light meter that reads full f/stops plus a fraction in between expressed in tenths. If I took a reading that said 1/125th of a second at f/5.6 plus four of these ten segments, I could go through the machinations to figure out exactly what f/stop that is (f/6.25) but that's not all that handy, to tell you the truth. No lenses are incremented in tenths of stops and tenth-stops are a needless amount of precision anyway given all the sources of slop in photography. Half and third stops are about as fine a distinction as matters. I have had a number of inquiries about what the intermediate stops are. I finally did a Printable Sheet of Third-Stop Increments which you can look at if you are deeply interested.
I took my lens apart. The aperture is nowhere near as big as the calculation shows. What's up?
You're right. I had an email from a guy who had taken apart a Rokkor 300mm f/4.5 (for other reasons, not to check my measurements) and he said the diameter of the f/stop blades was way smaller than the calculation would indicate. The calculations above would be accurate if the aperture blades were mounted right in front of the front element. In fact, they're buried in the lens somewhere and, on the Nikkor 300mm f/4.5 IF-ED I used to own, were actually located behind all the lens elements. They still have the same relationship but the manufacturer can make the aperture blades way smaller in the light path partway back. However, the relationship is the same between each of the adjacent stops.
Why are they called f/stops?
I have no idea. I've never read an authoritative description of where the name came from. I have a vague memory that the defunct magazine Modern Photography did an article about it in about 1974 but my vague memory also seems to recall that it might have been the April issue. I have received a number of emails over the years with helpful but conflicting opinions on this and one day I'll compile them into a separate page.
My lens or camera has Image Stabilization and it's worth 2 stops. What does that mean?
To be clear, it does not mean that more light comes through the lens. What Image Stabilization (IS) does is move something around (a lens element or sometimes the digital sensor) to compensate for the natural unsteadiness of your body. Remember when I said "stops" can refer to more than just f/stops? This is one of those cases. What this means is that the IS will allow you to hold the camera steady at a slower shutter speed without body-motion-induced blur. If you could hold your 200 at 1/250th before but started blurring at 1/125th, you can now go down 2 stops (from 1/250 to 1/125 to 1/60) and still have an image as sharp as at 1/250th. Note this only accounts for blur induced by you--if you're trying to stop action, the amount of blur from subject movement will still be the same. Note that sometimes on digital cameras the IS is really only jacking up the ISO a couple of stops with all the implications that has for noise. Optical Image Stabilization means there is actually something moving, not just a sensor ISO change.
Is the f/stop all I need to know about the light transmission through the lens?
Probably. It's good enough for virtually all amateurs and nearly all professionals. There is a concept called t/stop, for transmission stop, which is a measure of the actual light transmission of the lens rather than the simple ratio of the aperture to the focal length. The t/stop can vary from the f/stop because you have a lot of lens elements (big zoom lenses might have these) or you have one lens coated and another not coated. About the only people who need this level of precision are professional cinemaphotographers who use the t/stop to set exposure. Their lenses sometimes have both f/stop and t/stop scales marked. Even when they know the t/stops of the lens, the f/stops remain important because depth of field is driven by the f/stop regardless of the light-passing ability of the glass. I have never seen a still photography lens marked in t/stops, but the concept is out there so I thought I'd mention it.
The only time I have found the marked f/stop to be undependable was with a Vivitar 600mm f/8 Series One lens I had. This was a catadioptric (mirror) lens billed as a Solid Cat because rather than mirrors and airspace, it had mirrors with solid glass in between. This puppy weighed a lot! Anyway, the lens was f/8 but my own experience was that if you used a separate meter you'd better think about it as an f/8 and a half or f/11 lens.
So What's Important in all this?
You need to know the doubling/halving relationship and how it works with shutter speeds in exposure. This is key since the shutter speeds and f/stops you choose have implications in how your final photograph will look in ways other than purely the amount of light on the film. You need to know that as you stop down you get more depth of field. You do not need to go around calculating aperture areas for your lenses and f/stops. If you're like me, it's worth doing it once to see that it works, then forgetting about.
How a Range of Settings Gives the Same Amount of Light
Now, to bring this all together, we know that the shutter speeds and f/stops both double and halve. Thus, we know that we can open up an f/stop (letting in twice the light) and move the shutter speed one step faster (cutting the time in half) and have the same amount of light on the film. For instance, if we meter a scene and it tells us that 1/125th at f/8 is the correct exposure, any of the following combinations would work:
| Shutter Speed | 1/4 second | 1/8 | 1/15 | 1/30 | 1/60 | 1/125 | 1/250 | 1/500 | 1/1000 | 1/2000 | 1/4000 |
| f/stop | f/45 | f/32 | f/22 | f/16 | f/11 | f/8 | f/5.6 | f/4 | f/2.8 | f/2 | f/1.4 |
Practically speaking, you aren't going to have one lens which takes you from f/1.4 to f/45 and your camera body may not have the higher shutter speeds. Also, if you are without a tripod, there are limits to how slow your shutter speed can be before your body movements blur the photo, so there are some constraints. But the point remains, all these combinations yield the same amount of light on the film and an identical picture in terms of brightness. What does vary is the ability of the camera to stop action and the depth of field, or how much is in focus in front of and behind the subject. This gives you some control over how your photographs will turn out. You should understand it and use it.
Additional Basic Photography Terms
aperture - the amount of light being let in through the lens (lens opening) see f-stop
ASA - a film speed rating similar to an IOS rating
bracket - to over and then under expose from the indicated camera settings. This technique provides several different exposures from which one may choose the best negative for printing.
burn in - to darken a specific area of a print by giving it additional printing exposure
contrast - the difference between light and dark values. An image that is only pure black and white with no shades of gray is said to have high contrast. Images with many shades of gray and no black or white are low contrast
density - the amount (or thickness) of silver on the film or paper. Over exposed negatives are dense (thick) with silver. When maximum density is reached the negative or print is as black as possible. This maximum density is called D-MAX.
depth of field - the distance range between the nearest and farthest points that are in acceptably sharp focus. Depth of field is altered by 1. aperture size 2. length of lens 3. distance to subject
dodge - to lighten an area of a print by shading it during part of the printing exposure
emulsion - a light sensitive coating applied to photographic films or papers. It consists of silver halide crystals and other chemicals suspended in gelatin
fill light - a source of illumination that lightens shadows cast by the main light and thereby reduces the contrast in a photograph
f-stop - also referred to as f- number. A number indicating the size of the lens opening. It is determined by dividing the focal length of a lens by the diameter of the aperture when measured in millimeters.
grain - the clumping of silver in the negative that gives the image a "sandy" or "speckled" appearance. Films with low ISO numbers will have less clumping and therefore finer grain.
ISO - (international standards organization) a numerical rating that describes the sensitivity of a film to light. The ISO rating doubles as the sensitivity of the film doubles. rating combines the ASA (once standard in US) and the DIN (European standard) an example would be ISO 100/20*
panning - to follow the motion of a moving object with the camera this will cause the object to look sharp and the background blurred
reciprocity - reciprocity law - the relationship between length of exposure and aperture size. When equivalent exposures are required, an increase in one will be balanced by a decrease in the other. For example, doubling aperture size will be balanced exactly by halving the exposure time. The reciprocity law fails with very short or very long exposures.
stop down - to use a smaller lens opening
Digital Photography Glossary
Struggling with a word or phrase? You're not alone. Photography has long had its own language, and digital photography adds many new terms. This glossary defines commonly used words and phrases in digital photography.
Ambient light – The natural light in a scene.
Archival – The ability of a material, including some printing papers and compact discs, to last for many years.
Aperture – A small, circular opening inside the lens that can change in diameter to control the amount of light reaching the camera's sensor as a picture is taken. The aperture diameter is expressed in f-stops; the lower the number, the larger the aperture. For instance, the aperture opening when set to f/2.8 is larger than at f/8. The aperture and shutter speed together control the total amount of light reaching the sensor. A larger aperture passes more light through to the sensor. Many cameras have an aperture priority mode that allows you to adjust the aperture to your own liking. See also shutter speed.
Application – A computer program, such as an image editor or image browser.
Buffer – Memory in the camera that stores digital photos before they are written to the memory card.
Burning – Selectively darkening part of a photo with an image editing program.
CCD – Charge Coupled Device: one of the two main types of image sensors used in digital cameras. When a picture is taken, the CCD is struck by light coming through the camera's lens. Each of the thousands or millions of tiny pixels that make up the CCD convert this light into electrons. The number of electrons, usually described as the pixel's accumulated charge, is measured, then converted to a digital value. This last step occurs outside the CCD, in a camera component called an analog-to-digital converter.
CD-R – CD-Recordable: a compact disc that holds either 650 or 700 MB of digital information, including digital photos. Creating one is commonly referred to as burning a CD. A CD-R disc can only be written to once, and is an ideal storage medium for original digital photos.
CD-RW – CD-Rewritable: similar in virtually all respects to a CD-R, except that a CD-RW disc can be written and erased many times. This makes them best suited to many backup tasks, but not for long term storage of original digital photos.
CMOS – Complementary Metal-Oxide Semiconductor: one of the two main types of image sensors used in digital cameras. Its basic function is the same as that of a CCD. CMOS sensors are currently found in only a handful of digital cameras.
CMYK – Cyan, Magenta, Yellow, Black. The four colors in the inksets of many photo-quality printers. Some printers use six ink colors to achieve smoother, more photographic prints. The two additional colors are often lighter shades of cyan and magenta.
CompactFlash™ – A common type of digital camera memory card, about the size of a matchbook. There are two types of cards, Type I and Type II. They vary only in their thickness, with Type I being slightly thinner. A CompactFlash memory card can contain either flash memory or a miniature hard drive. The flash memory type is more prevalent.
Contrast – The difference between the darkest and lightest areas in a photo. The greater the difference, the higher the contrast.
Digital camera – A camera that captures the photo not on film, but in an electronic imaging sensor that takes the place of film.
Dodging – Selectively lightening part of a photo with an image editing program.
Download, downloading – The process of moving computer data from one location to another. Though the term is normally used to describe the transfer, or downloading, of data from the Internet, it is also used to describe the transfer of photos from a camera memory card to the computer. Example: I downloaded photos to my PC.
DPI – Dots per inch: A measurement of the resolution of a digital photo or digital device, including digital cameras and printers. The higher the number, the greater the resolution.
EXIF – Exchangeable Image File: the file format used by most digital cameras. For example, when a typical camera is set to record a JPEG, it's actually recording an EXIF file that uses JPEG compression to compress the photo data within the file.
External flash – A supplementary flash unit that connects to the camera with a cable, or is triggered by the light from the camera's internal flash. Many fun and creative effects can be created with external flash.
File – A computer document.
Fill flash – A flash technique used to brighten deep shadow areas, typically outdoors on sunny days. Some digital cameras include a fill flash mode that forces the flash to fire, even in bright light.
Fire – Slang for shooting a picture. Example: I pressed the shutter button to fire.
FireWire – A type of cabling technology for transferring data to and from digital devices at high speed. Some professional digital cameras and memory card readers connect to the computer over FireWire. FireWire card readers are typically faster than those that connect via USB. Also known as IEEE 1394, FireWire was invented by Apple Computer but is now commonly used with Windows-based PCs as well.
Grayscale – A photo made up of varying tones of black and white. Grayscale is synonymous with black and white.
Highlights – The brightest parts of a photo.
Histogram – A graphic representation of the range of tones from dark to light in a photo. Some digital cameras include a histogram feature that enables a precise check on the exposure of the photo.
Image browser – An application that enables you to view digital photos. Some browsers also allow you to rename files, convert photos from one file format to another, add text descriptions, and more.
Image editor – A computer program that enables you to adjust a photo to improve its appearance. With image editing software, you can darken or lighten a photo, rotate it, adjust its contrast, crop out extraneous detail, remove red-eye and more.
Image resolution - The number of pixels in a digital photo is commonly referred to as its image resolution.
Inkjet – A printer that places ink on the paper by spraying droplets through tiny nozzles.
ISO speed – A rating of a film's sensitivity to light. Though digital cameras don't use film, they have adopted the same rating system for describing the sensitivity of the camera's imaging sensor. Digital cameras often include a control for adjusting the ISO speed; some will adjust it automatically depending on the lighting conditions, adjusting it upwards as the available light dims. Generally, as ISO speed climbs, image quality drops.
JPEG – A standard for compressing image data developed by the Joint Photographic Experts Group, hence the name JPEG. Strictly speaking, JPEG is not a file format, it's a compression method that is used within a file format, such as the EXIF-JPEG format common to digital cameras. It is referred to as a lossy format, which means some quality is lost in achieving JPEG's high compression rates. Usually, if a high-quality, low-compression JPEG setting is chosen on a digital camera, the loss of quality is not detectable to the eye.
LCD – Liquid Crystal Display: a low-power monitor often used on the top and/or rear of a digital camera to display settings or the photo itself.
Media – Material that information is written to and stored on. Digital photography storage media includes CompactFlash cards and CDs.
Megabyte (MB) – A measurement of data storage equal to 1024 kilobytes (KB).
Megapixel – Equal to one million pixels.
Memory Stick®—A memory card slightly smaller than a single stick of chewing gum. Like CompactFlash and SmartMedia, it is flash-based storage for your photos.
NiMH – Nickel Metal-Hydride: a type of rechargeable battery that can be recharged many times. NiMH batteries provide sufficient power to run digital cameras and flashes.
Online photo printer – A company that receives digital photos uploaded to its Web site, prints them, then sends the prints back by mail or courier.
Panning – A photography technique in which the camera follows a moving subject. Done correctly, the subject is sharp and clear, while the background is blurred, giving a sense of motion to the photo.
Pixel – Picture Element: digital photographs are comprised of thousands or millions of them; they are the building blocks of a digital photo.
RAW – The RAW image format is the data as it comes directly off the CCD, with no in-camera processing is performed.
Red-eye – The red glow from a subject's eyes caused by light from a flash reflecting off the blood vessels behind the retina in the eye. The effect is most common when light levels are low, outdoor at night, or indoor in a dimly-lit room.
RGB – Red, Green, Blue: the three colors to which the human visual system, digital cameras and many other devices are sensitive.
Saturation – How rich the colors are in a photo.
Sensitivity – See ISO speed.
Serial – A method for connecting an external device such as a printer, scanner, or camera, to a computer. It has been all but replaced by USB and FireWire in modern computers.
Sharpness – The clarity of detail in a photo.
Shutter speed – The camera's shutter speed is a measurement of how long its shutter remains open as the picture is taken. The slower the shutter speed, the longer the exposure time. When the shutter speed is set to 1/125 or simply 125, this means that the shutter will be open for exactly 1/125th of one second. The shutter speed and aperture together control the total amount of light reaching the sensor. Some digital cameras have a shutter priority mode that allows you to set the shutter speed to your liking. See also aperture.
SmartMedia™—a wafer-thin, matchbook size memory card. This is also a flash-memory based storage medium.
Thumbnail – A small version of a photo. Image browsers commonly display thumbnails of photos several or even dozens at a time. In Windows XP's My Pictures, you can view thumbnails of photos in both the Thumbnails and Filmstrip view modes.
USB – Universal Serial Bus: a protocol for transferring data to and from digital devices. Many digital cameras and memory card readers connect to the USB port on a computer. USB card readers are typically faster than cameras or readers that connect to the serial port, but slower than those that connect via FireWire.
White balance – A function on the camera to compensate for different colors of light being emitted by different light sources.
Sunday, October 21, 2007
Photoshop Tutorial: Super Slick Dusky Lighting Effects in Photoshop
One of the best sites around for desktops has to be Desktopography. Inspired by their amazing work today we are going to put together a sunset image mixing some vector shapes and dusky lighting effects to produce a slick image that would make a nice album cover for a chillout mix!
What we are Making
Click the image for the high-res version.
Steps and Assets
As always you can download the PSD file to follow along at the bottom of this tutorial. It's a pretty large file so be warned! Additionally we are using a few assets including a photo from iStockPhotoArsenal's Freebie Section. Note that in the sample PSD I've merged some text onto the original image to protect it's copyright since its such a large copy. and some vectors from
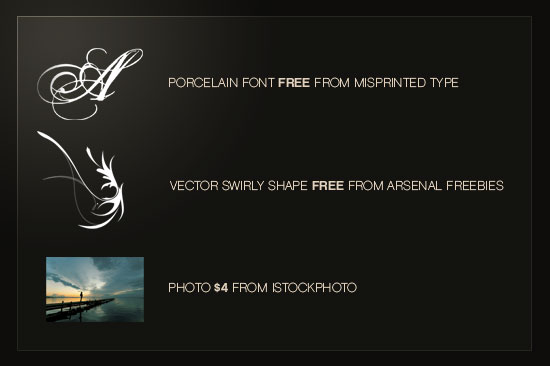
Step 1:
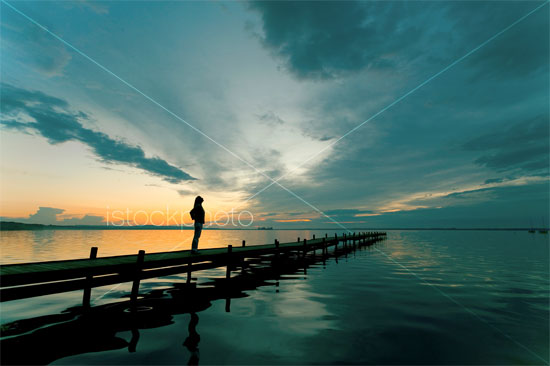
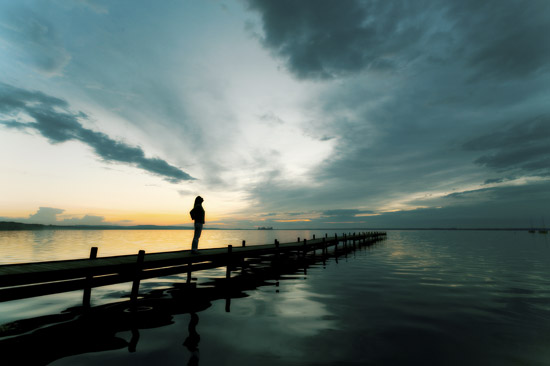
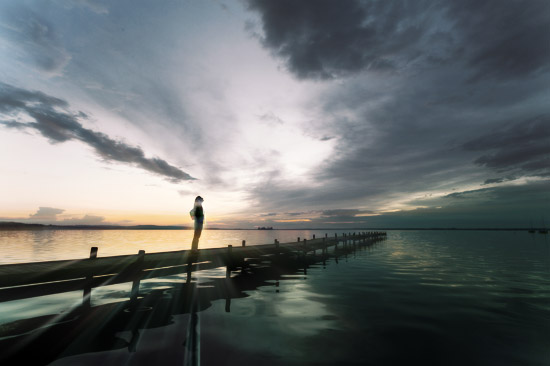
So here's our original photo from iStock. It's a pretty gorgeous photo with great sunset lighting and contrast for us to build on.
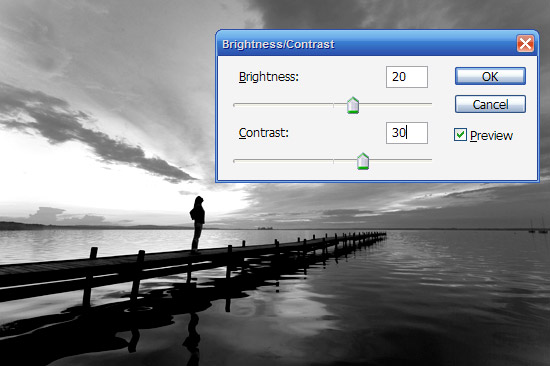
Step 2:
So first off we duplicate the photo, press CTRL-SHIFT-U to desaturate the image to Black and White. Then go to Image > Adjustments > Brightness/Contrast and make the image a bit brighter and contrastier as shown.
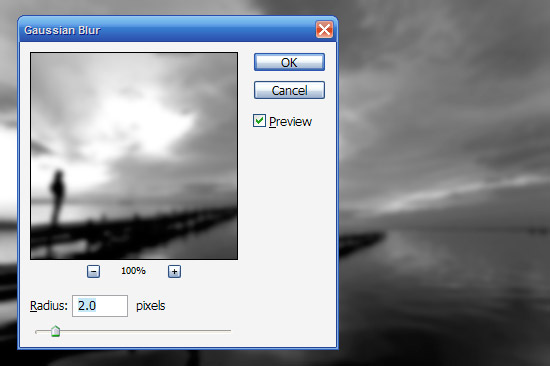
Step 3:
Now go to Filters > Blur > Gaussian Blur and apply a mild blur of 2px.
Step 4:
Now we set the blurred black and white layer to blending mode Overlay and opacity 50%. This gives us a slightly surreal blurring on the image. BE WARNED: This effect (blurring then overlaying) is a bit of favourite of amateurs, so go easy on it. When you do use it, make sure you fade it out a reasonable amount so it doesn't look too tacky.
Step 5:
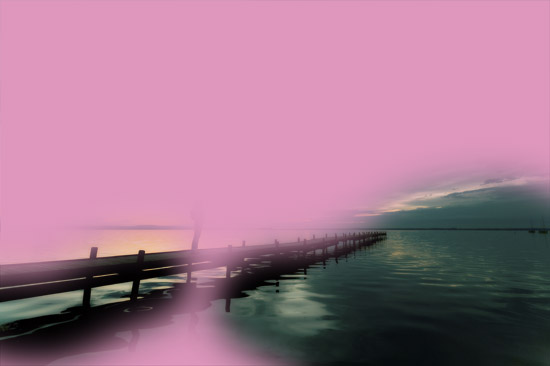
Now the lighting is pretty nice already, but I'd like some pinkish hues in the image as it makes the image a lot warmer than bluish colours. So in a new layer we fill with a paintbucket a bright pink colour. I then got out the Eraser tool with a large, soft brush and removed some areas as you can see where I didn't want as much pink to shine through (this was pretty arbitrary and just gives the image more depth rather it being uniformly coloured). We then set the blending mode to Colour20% opacity. Actually in reality I did those two steps the other way around (I blended first then erased the bits I didn't want). and
Step 6:
Here's the image after adding the pink.
Step 7:
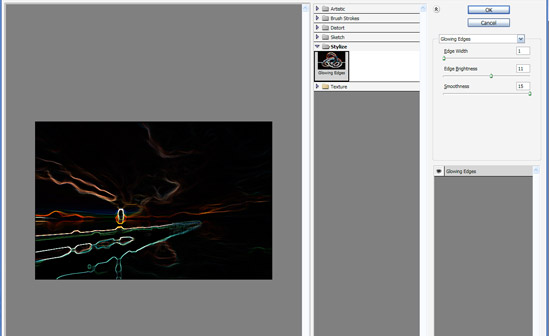
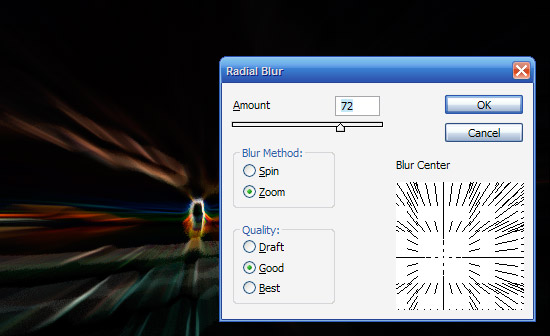
Now to make the sun rays we are going to use a combination of glowing edges and radial blurring. So duplicate the original coloured layer and put it on top of all the other layers. Then go to Filter > Stylize > Glowing Edges and use settings of 1, 11 and 15 respectively for Width, Brightness and Smoothness.
Step 8:
Now we go to Filter > Blur > Radial Blur and apply settings as shown. Make sure that you have set the blur method to Zoom (not Spin). Also importantly move the Blur Centre until it's roughly in the position of the image where the woman was standing, i.e. where the 'sun' is going to be. You may have to do this a couple of times to get the positioning exactly right because it's a bit trial and error.
Once you've got it, apply the Radial Blur again by pressing CTRL-F (to repeat the last filter used).
Step 9:
Now set the blending mode for this layer to Screen.
Screen blending mode basically knocks out darker colours to only leave the lighter ones. This is the opposite to Multiply which knocks out any lighter colours and just leaves darker ones. This is really handy for when you have say a logo on a white background and you want to apply it to an image but don't want to cut it out - instead you just set it to Multiply (or Screen if its on black).
Step 10:
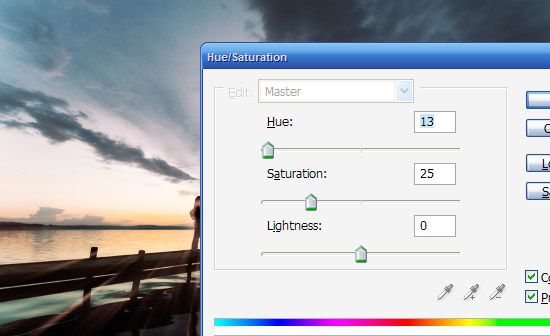
To get the light looking more like sunlight, we go to Image > Adjustments > Hue/Saturation and tick the box that says "Colourize" to add some more colour to the light rays. Then move the sliders around until you get a reddish tint and press OK.
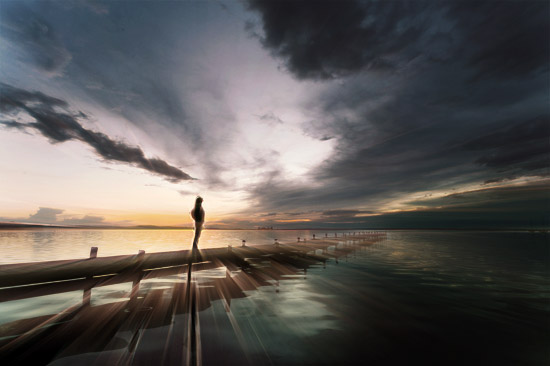
Step 11:
Now repeat the process (Glowing Edges > Radial Blur > Screening the Image) a couple of times to get more light rays as shown. Try moving the Radial Zoom filter around a little to get different casts of light to mix together.
Also as you add extra layers on you can always use the Eraser tool to remove some parts of a layer and leave others so that they blend together well. This is generally a matter of playing around with the image until it looks right. Also note that you can also use Layer Masks to do this without losing any image data, but because I never used Masks when I was learning Photoshop, out of habit I still do things the old (and probably a bit dumb) way :-)
Step 12:
Next we want to add the big glowing centre to the image. So create a new layer on top of all the others and get a large, soft brush and with White as your foreground colour paint a blob of white over where the woman's silhouette is.
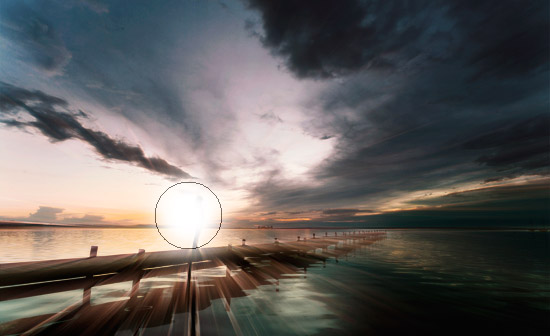
Step 13:
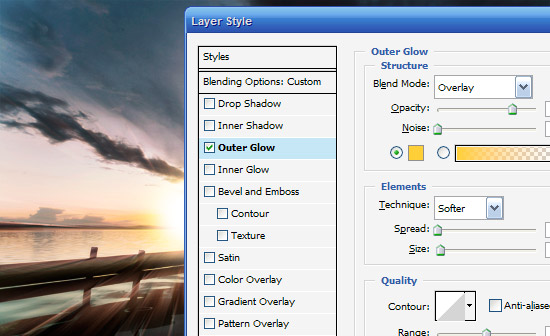
To this blob of white we now add an Outer Glow of yellow set to Overlay (as shown). You can do this by right clicking on the layer and selecting Blending Options.
Step 14:
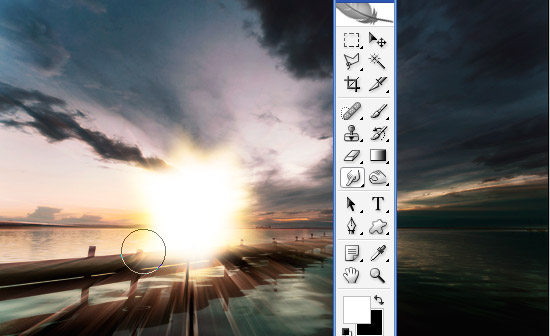
Now in your tools palette choose the Smudge Tool (R) which you can see in the image and using your mouse smudge your ball of light outwards. Note that in the image shown I've done some pretty big smudges so you can see roughly what we're doing, but in reality you should make smaller, more subtle smudges.
What you are trying to do here is give it a burst of light feel. You might want to duplicate the layer and have a couple of them together which is what I've done in the sample PSD.
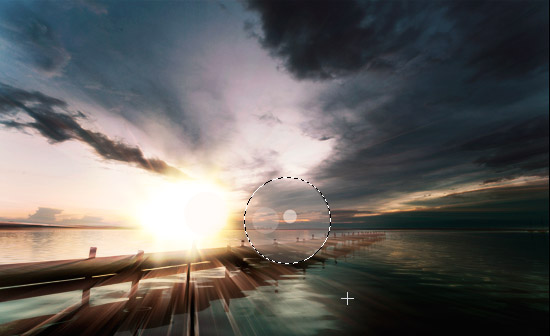
Step 15:
Now what sunset would be complete without a lens flare? Rather than using the filter though just create a new layer on top and draw a circle as shown and fill it with white. Set it to blending mode Overlay and about 10% opacity . Then create a new layer and do the same with a smaller circle and repeat again a couple of times until you have a subtle lens flare as shown.
Then merge the layers together and set it all to about 30% because we want this to be really subtle!
Step 16:
Now in new layers we paste in some of our vector images. I've used a sort of swirly wing thing from Arsenal's Freebie Section and also the capital letter "A" from a font called Porcelain which you can get from Misprinted Type for free.
I chose both because they have lots of lines and swirls which fits what I want to do. I also duplicated the swirly wing vector, flipped it by going to Edit > Transform > Flip Horizontal, then CTRL-T to get transform up and scaled it down. That way its good for little details.
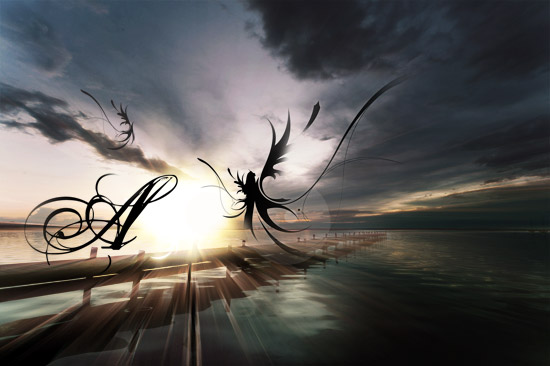
Step 17:
Now fit the three images together as shown. When we switch them to white we want most of the objects to be obscured with just bits of swirl poking out the edges.
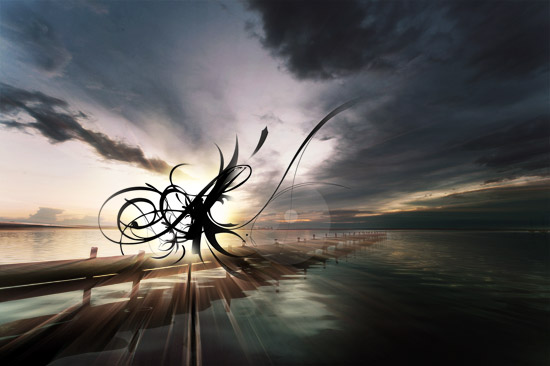
Step 18:
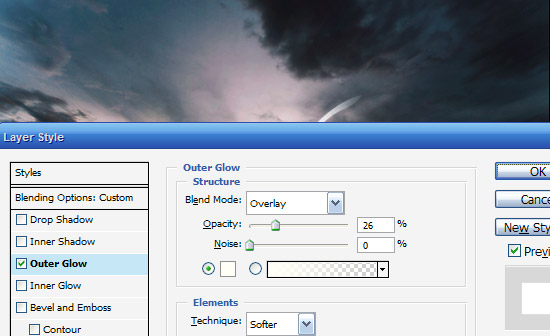
So now for each layer we press CTRL-I to invert the colour from Black to White and then right click the layers and select Blending Options. Then add an Outer Glow as shown to make them fit in with the main ball of light.
Step 19:
You should now have something that looks like the image below.

Step 20:
Now for the final touches, I've added some text using the font Chalet which is a wonderfully elegant but isn't too over the top. Note that you might feel tempted to add a swirly, cursive type font for text, but this would be overkill. It's much better to contrast the complexity of the main image with a very simple and understated type treatment (in my opinion). Anyhow as you can see I've placed it near the centre of the image.
Looking at the final image I also decided it needed a little more colour, so added a layer at the very top, filled with a reddish colour (#957070) and set it to Overlay / 30%. This warms up the image a little more, and you'll see that layer in the final shot.
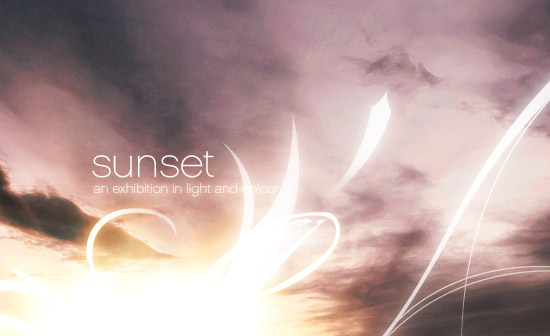
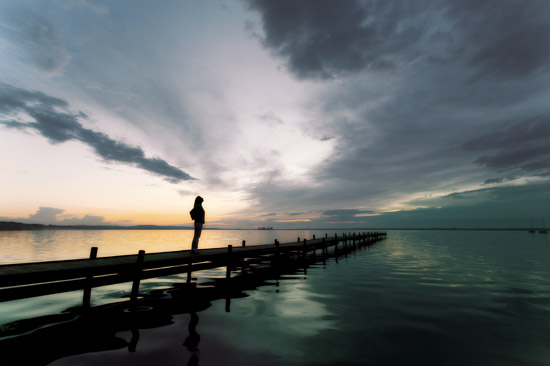
Final Image:
And finally we're all done, Click the image below for the high-res version of our finished product!
Wednesday, September 19, 2007
Saturday, August 11, 2007
7 Strategies for Avoiding Flash Blow Out
7 Strategies for Avoiding Flash Blow Out

Last weekend I was at a party with my point and shoot digital camera and wanting to take a few shots to help us all remember the night. The problem was that it was a poorly lit room and I needed to use my flash. The result was a lot of blown out images. The flash was too strong! What should I do next time? - Sally
You’re not alone with this problem Sally - I see a lot of shots suffering from ‘flash blowout’ syndrome, many taken on point and shoot digital cameras. In fact while searching on Flickr for such shots today I found so many - it must be one of the most common problems that people face in their digital photography.
The problem that point and shoot camera owners face when it comes to using flash to light a scene is that many point and shoot cameras offer a photographer much less control over how powerful the flash is and what direction the light is pointed (in comparison to a DSLR with a dedicated flash unit that can be bounced in different directions at different levels).
However don’t resign yourself to flash dominated shots - all is not lost. Below are 7 tips for point and shoot users (and DSLR users wanting to use their camera’s flash).
Learn to See Your Flash as a Secondary Light Source
Before I give some specific tips on decreasing the impact of your flash on your shots let me share a tip that a more experienced and wise photographer once gave me.
A flash should only ever be thought of as a secondary light source. In almost every situation that you will want to photograph there will be some level of existing ambient light. This light is important as it is the natural light of the scene you’re trying to capture. Your flash should be used to supplement existing light rather than as the primary way of lighting a scene. If you use a flash as the primary source of light it will look artificial.
As a result of knowing this you’ll find that most of the following strategies are about making the flash more subtle or making the natural light more noticeable.
OK - so lets get on with some strategies and techniques for Avoiding Flash Blow Out:
1. Take a Step Back

One of the simplest ways to decrease the impact of the light coming from your flash is to put a little more distance between you and your subject. While I generally advise people to get in close to their subject and fill the frame - this can often make the effect of a flash even brighter. Many of the blown out flash shots that I see are simply because the photographer is too close to their subject.
Stepping back further away from your subject doesn’t mean that you can’t fill the frame. You could use your camera’s zoom lens (although this can increase the effect of camera shake) or simply crop the shot later on your computer.
2. Diffuse It
If your digital camera doesn’t allow you to have any control over how much light it outputs (see below for more on this) you might want to consider manually making some changes that limit or diffuse the light coming out of your digital camera. This is something that users of dedicated flash units can do by using specifically made flash diffusers - but point and shoot owners may need to get a little more creative and hack their own solution.
One of the most effective ways of doing this is simply to find some semi opaque material to place over your flash. I’ve seen some point and shoot owners stick a little white tissue paper over their flash and others do this with a little piece of cellotape (the semi-opache kind). Just remember that the color of the material that you use will impact the color of the light that comes out of your flash (and therefore the color cast on the scene) - so white tape or tissue paper will give a more natural light than red or blue!

3. Redirect it
Another strategy that dedicated flash users will often use is to redirect or bouncing the light coming out of their flash off another surface. They are able to do this because these flash units are able to be swiveled and shot into different directions.
Point and Shoot users obviously can’t change the direction that their flash points - but might want to try ‘hacking’ their camera in this way also. I’ve seen a few photographers do this simply by taking a small piece of white card and putting it at an angle in front of the flash so that the flash is redirected up onto the ceiling of the room (or even sideways onto a wall).
This little hack will need some experimentation to get the angle of the card right and the results will vary quite a bit depending upon the situation that you’re photographing (distance to your subject, how high the ceiling is, how much ambient light there is etc). Again, the color of both the card you use as well as the ceiling or wall that you’re bouncing the light off will impact the color cast in the shot.
4. Night Mode

Most point and shoot digital cameras have a fun little option on their mode dial called night mode. This mode tells the camera to use a technique called ‘slow sync flash‘. It means taking a shot with a slower shutter speed while still shooting the flash. This means that you get a little more ambient light from the scene while still freezing the action with the flash (like the shot to the left). The shots taken in this mode won’t give you pin point sharp images - but they can be fun and very effective (particularly if there is some nice colored lights in the room).
5. Decrease Flash Output
Some point and shoot cameras have the ability to tell the camera just how much flash you want it to use. This won’t be something you all have at your finger tips but check your camera’s manual to see if you have it. If you do, dial back your flash output by a stop or two to see what impact it has. It might take a little experimentation to get the setting just right but it can help you end up with much more natural shots.
6. Add Light
This one could get you kicked out of the party - but getting a little more light on the scene is another pretty obvious way to help the situation. At an extreme level this might mean turning on all the lights in the room (and potentially destroying the mode) or it could mean moving your subjects to a better lit position near a lamp or light. I’ve done this in photographing wedding receptions - simply positioning myself in front of an open door that leads into a better lit room where the light spills in lighting up the faces of guests on the dance floor.
Another way to increase the impact of ambient light on a subject is to think about reflective light. For example photographing someone standing next to a white wall as opposed to a black wall will mean that any ambient light in the room will be bounced onto them (this is similar to having your own reflector).

7. ISO, Shutter Speeds and Aperture
One last way to decrease the impact has on a scene is to tweak some of your camera’s exposure settings - particularly those that impact how the camera treats light like ISO, Aperture and Shutter Speed.
This isn’t the place for a detailed explanation of the basics of exposure but if your camera allows you to change any of these settings they could be helpful. In brief:
- ISO - increase the ISO setting and you increase the camera’s sensitivity to light. This means the ambient light in the room will have more effect and you’ll have less need for flash. Keep in mind that increasing ISO also increases the grain or noise in your shots.
- Aperture - as you increase the aperture of your camera you increase the size of the hole in your lens and more light is able to get in quickly. So increasing aperture (this means decreasing the f/number) can be something to experiment with. Keep in mind that this means you also decrease the depth of field in your shot meaning you need to get your focus spot on and that not everything in your shot might be in focus.
- Shutter Speed - lengthening the amount of time that your shutter is open increases the amount of light hitting your image sensor. This is another factor in exposure that you might like to experiment with. Keep in mind that if there is movement in your scene (even small movements) that the longer the shutter is open the more blur you’ll get in your shot.
Please note - not all point and shoot digital cameras have the ability impact all (or any) of these settings. Check your manual - particularly to see if your camera has Aperture or Shutter Speed Priority Modes. I’d personally start with increasing ISO and then switching to a larger Aperture before playing with Shutter Speed (unless it was part of a Slow Sync Flash strategy).
Article Take From: http://digital-photography-school.com/blog/
